





Your WordPress site loads slowly, visitors bounce, and you’ve got no idea why. Chances are, your Largest Contentful Paint score is tanking.
LCP measures how long it takes for the largest visible element on your page to load (usually an image or video), and Google takes it seriously when ranking your site.
Here is the good news: Fix Largest Contentful Paint in wordpress is doable without hiring an expensive developer.
In this guide, We’ll walk you through practical steps to improve lcp and boost your site’s performance.
What is Largest Contentful Paint and Why Does It Matter?
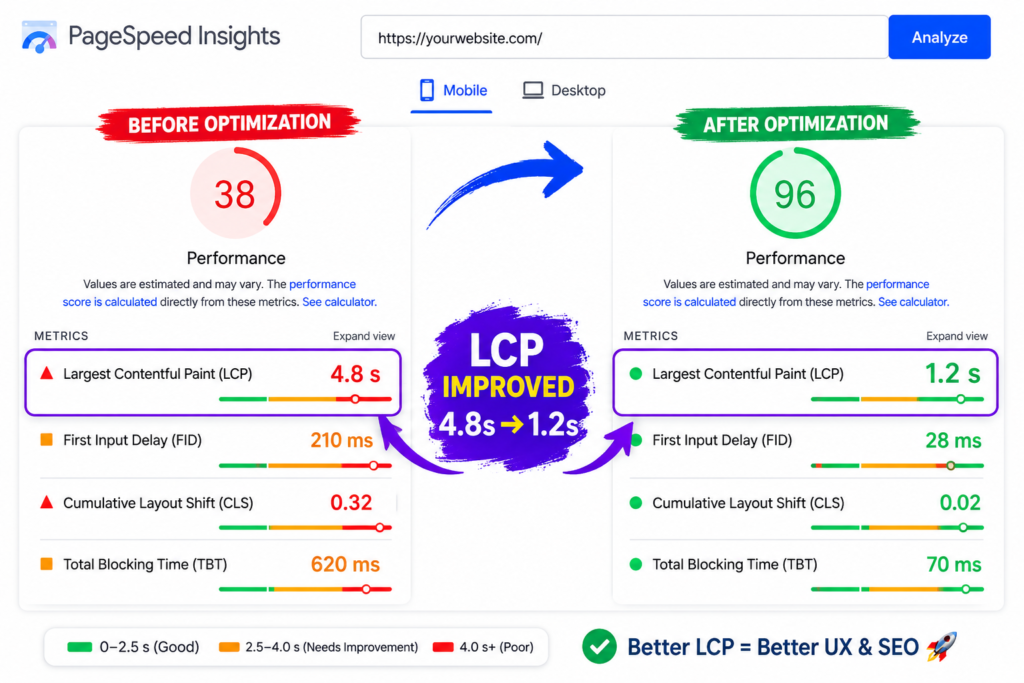
LCP (Largest Contentful Paint) is one of Google’s Core Web Vitals. It tracks when the main content area of your page fully renders. If your hero image takes 5 seconds to load, your LCP is 5 seconds.
Google recommends keeping LCP under 2.5 seconds. Faster pages mean better user experience, lower bounce rates, and higher search rankings. Sites with poor LCP lose both users and SEO traffic.
| Quick Check: Run your WordPress site through Google PageSpeed Insights to see your current LCP score. If it’s above 2.5 seconds, follow the steps outlined below to fix Largest Contentful Paint in your WordPress site. |
Step 1: Optimize Images to Fix Largest Contentful Paint in WordPress
Large, uncompressed images are one of the most common culprits behind a slow LCP score. If your hero image is several megabytes in size, the browser has to download all of that before it can display anything meaningful to your visitor and everything else on the page waits in line behind it.
Compress Before Upload
Before uploading any image to WordPress, run it through a free tool like TinyPNG or ImageOptim first. These tools shrink file sizes significantly without any visible drop in quality & it takes about 10 seconds and makes a real difference.
Install an Image Optimization Plugin
For images already on your site, a plugin like Smush or ShortPixel can compress them in bulk automatically. Both plugins also convert your images to WebP — a modern image format that browsers load noticeably faster than standard JPEGs without you having to do anything manually.
| Developer Tip: When uploading images via code, make sure to strip EXIF data this is hidden information embedded in every photo (like the camera model or GPS location it was taken at) that adds unnecessary weight to the file without affecting how the image looks on screen. Most image optimisation libraries have a one-line option to remove it automatically. |
Step 2: Implement Lazy Loading
Lazy loading is a technique where a webpage doesn’t load all of its content at once instead, it only loads what you actually need at that moment.
Think of it like a restaurant menu that only shows you the appetizers first, and only brings out the main course when you’re ready for it.
On a webpage, this typically applies to images and videos: instead of loading every single image on the page the moment you open it, the browser only loads the images that are currently visible on your screen.
As you scroll down, more images load just in time for you to see them. This makes the page feel faster to open and saves data for users who never scroll all the way down. This frees up bandwidth and helps you Fix Largest Contentful Paint in WordPress by prioritizing critical content.
Most WordPress sites actually have lazy loading built in already; it’s been a default feature since WordPress 5.5, so there’s a good chance you don’t need to do anything at all.
To check, simply open your website, right-click on any image, select “Inspect,” and look for the text loading="lazy" in the code that appears — if it’s there, you’re all set.
If it’s not, the easiest fix is to install a free plugin like Smush or Rocket Lazy Load just search for either one in your WordPress dashboard under Plugins > Add New, install it, and activate it.
These plugins are also handy because they go a step further than WordPress’s built-in feature, covering things like background images and videos that WordPress doesn’t lazy load on its own.
Step 3: Use a Content Delivery Network (CDN)
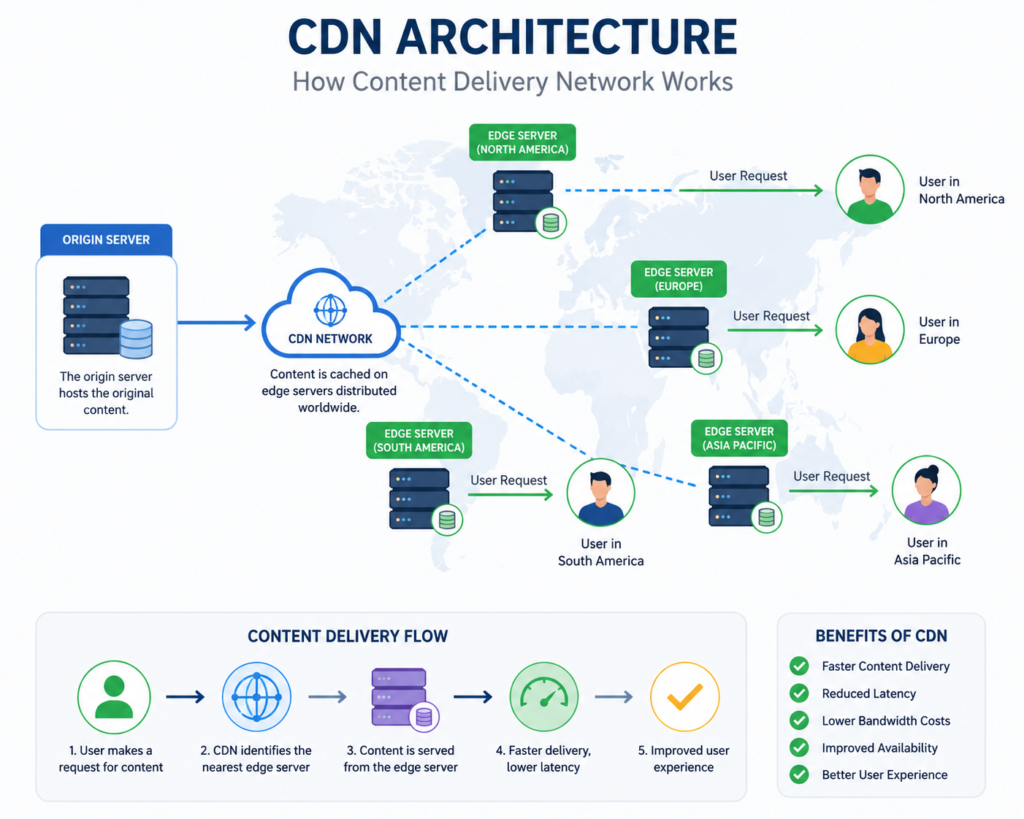
A CDN (Content Delivery Network) is essentially a network of servers spread across different locations around the world, all working together to deliver your website’s content to visitors as quickly as possible.
Normally, when someone visits your website, their request travels all the way to the single server where your site is hosted and if that server is in, say, the US but your visitor is in India, that’s a long distance for data to travel, which slows things down.
A CDN solves this by storing copies of your website’s files (images, videos, stylesheets) on multiple servers globally, so when someone visits your site, they’re served content from the server closest to them rather than the one far away. Think of it like a chain of local warehouses instead of one central factory your order ships from the nearest warehouse, so it arrives much faster.
A CDN can fix Largest Contentful Paint in WordPress bottlenecks by serving images from servers closest to your users.
Cloudflare and Bunny CDN are two of the most popular and beginner-friendly options for WordPress users.
Cloudflare has a generous free tier and takes about 10 minutes to set up. Just install the plugin from your WordPress dashboard, create a free account, and it handles the rest.
Bunny CDN is a paid option but very affordable, and is worth considering if your audience is spread across multiple countries.
Either way, once a CDN is active, your visitors will notice pages and images loading noticeably faster regardless of where in the world they’re browsing from.
Step 4: Prioritize Critical Resources
A critical resource is anything your webpage needs to load before it can display anything useful to the visitor; things like your main stylesheet (which controls how the page looks), key fonts, and the hero image or banner at the top of the page.
The browser has to fetch and process these first before it can render what the visitor actually sees, so if they’re slow to load, the visitor is stuck staring at a blank or broken-looking page.
Prioritising them simply means telling the browser “load these first, everything else can wait”; so instead of the browser treating every file on your page equally, it focuses its energy on the things that matter most to the first impression.
Think of it like packing for a trip you put your passport and wallet in an easily accessible pocket rather than burying them at the bottom of your suitcase, because you know you’ll need them first.
One of the most effective things you can do is add a fetchpriority="high" attribute to your hero image. This is a small piece of code that tells the browser to load it before anything else on the page.
Most site builders don’t expose this setting directly, so you’ll either need to ask your developer or use a free plugin like Code Snippets to add it manually without touching your theme files.
Beyond images, it’s also worth looking at the JavaScript running on your site. Plugins that load scripts on every page like live chat widgets or review tools can quietly slow down your LCP even on pages where those features aren’t needed.
Deferring or conditionally loading them (so they only load on pages that actually use them) can make a noticeable difference to load times.
Step 5: When to Get Professional Help?
If you’ve worked through all the steps above and your LCP is still above 3 seconds, your hosting itself might be the problem.
A slow or overloaded server adds unnecessary delay before your page even begins loading & no amount of image optimization or CDN setup can fully compensate for that.
At this point it’s worth getting in touch with a developer who can assess your server response times and recommend whether an upgrade or a switch to a faster host makes sense for your site.
| If you’d rather have someone handle it for you, CodeCaste specializes in WordPress performance we’ve helped 300+ sites bring their LCP well within Google’s recommended threshold. Let’s talk. |
Frequently Asked Questions
1. What's a good LCP score?
Under 2.5 seconds is good. 2.5 to 4 seconds is fair, and anything above 4 seconds needs improvement. You can check your score in PageSpeed Insights or your WordPress admin dashboard if you’re using a wordpress optimization plugin like MonsterInsights.
2. Do I need expensive hosting to fix LCP?
Not always. 80% of LCP problems come from unoptimized images and too many plugins. Image optimization, lazy loading, and a CDN often fix the issue on standard hosting. Move to premium hosting only if those don’t work.
3. Will fixing LCP boost my SEO?
Yes. LCP is a Core Web Vital ranking signal for Google. A faster LCP improves your search ranking, user experience, and conversion rates. It’s a win on all three fronts.
4. How do I know which element is affecting my LCP?
Open Chrome DevTools (F12), go to Performance, reload your page, and look for the LCP marker. It shows exactly which image or element is causing the delay. Usually it’s your hero image, featured video, or a large text block.
The Bottom Line
Fixing LCP doesn’t require a complete site rebuild. Start here:
- Compress images with TinyPNG or an optimization plugin
- Enable lazy loading in your theme settings
- Set up a CDN like Cloudflare (free)
- Test and refine using PageSpeed Insights
Most WordPress sites see LCP improvements within 1-2 weeks of applying these changes. Your users will notice the difference, and Google will reward you with better rankings.
Ready to optimize your WordPress site? CodeCaste offers free LCP audits and performance consulting. Let’s get your site faster. https://www.codecaste.com/contact-us