

You log into your WordPress dashboard one morning, and something is off. There are admin accounts you never created. Your homepage looks different. Or worse, Google has flagged your site for malware, and search traffic is plummeting.
It happens more often than most site owners expect, and it can happen to any WordPress site, regardless of size.
WordPress powers over 43% of all websites on the internet. That popularity makes it the single biggest target for automated bots, script kiddies, and organised hacking groups alike.
If you have a WordPress site and no formal wordpress security checklist in place, you are relying on luck, and luck is not a security strategy.
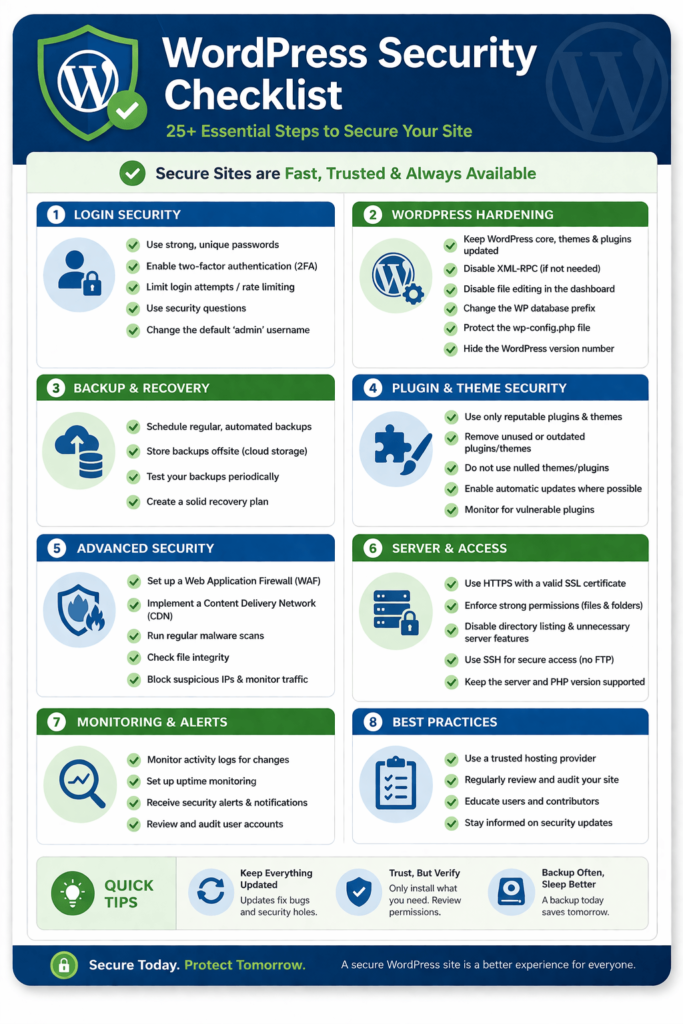
This wordpress security checklist gives you a practical, step-by-step system covering 25+ actions to secure your WordPress website, prevent WordPress hacks, and protect your site from hackers.
Some take two minutes. Others are a bit more involved. All of them matter.
| Quick Check Before You Start: Before diving in, take stock of your current setup: when did you last update WordPress core, your theme, and all plugins? When did you last change your admin password? Do you have a recent backup? If you hesitated on any of those, this checklist is exactly what you need. |
Step 1: WordPress Security Checklist – Keep WordPress Core Updated, Themes, and Plugins Updated
WordPress vulnerabilities are discovered regularly. When a patch is released, the vulnerability is often made public, which means attackers know exactly what to exploit on sites that haven’t updated yet.
Keeping everything updated is the single highest-impact item on any secure wordpress website checklist. Most successful WordPress hacks exploit known vulnerabilities in outdated software, not cutting-edge exploits.
What to update regularly
- WordPress core: Enable automatic minor updates. Major version updates should be tested first on a staging site.
- Themes: Even your inactive themes. If they have a vulnerability, attackers can still exploit it.
- Plugins: This is where most vulnerabilities live. Enable automatic updates for plugins you trust, and check the others weekly.
| Developer Tip: Use a staging environment to test updates before pushing them live. WP Staging or the built-in staging feature on managed hosts like Kinsta and WP Engine make this straightforward. |
Step 2: Use Strong, Unique Passwords and a Password Manager
“Password123” is not a password. Neither is your dog’s name. Weak admin credentials remain one of the most common entry points for attackers targeting WordPress sites.
Every account that has access to your WordPress site admin, editor, FTP, hosting, and database should have a unique, complex password. A password manager like 1Password, Bitwarden, or Dashlane removes the excuse of “I can’t remember that many passwords.”
Password requirements to enforce
- At least 16 characters
- Mix of uppercase, lowercase, numbers, and symbols
- Never reused across accounts
- Changed immediately if a service you use reports a breach
Step 3: Enable Two-Factor Authentication (2FA)
Even the strongest password can be compromised in a data breach. Two-factor authentication means that even if someone gets your password, they still can’t log in without the second factor, typically a code from an authenticator app.
How to secure wordpress site logins with 2FA: install a plugin like WP 2FA, Two Factor Authentication by miniOrange, or Wordfence Login Security. All support authenticator apps like Google Authenticator and Authy.
| Important Note: Enforce 2FA for all admin and editor accounts, not just your own. A compromised editor account can still do significant damage. |
Step 4: Change the Default Admin Username
When WordPress is installed, it suggests “admin” as the default username. The vast majority of brute-force attacks start by trying that exact username. Using “admin” is essentially leaving one lock unpicked.
To change it: create a new admin user with a different username, log in as that user, and delete the original “admin” account. Assign all existing content to the new account when prompted.
| Quick Check: Go to Users > All Users in your WordPress dashboard right now. Is there an account called ‘admin’? If yes, that’s your first fix. |
Step 5: Limit Login Attempts
By default, WordPress allows unlimited login attempts. Brute-force bots exploit this by hammering the login page with thousands of username-password combinations.
Limiting login attempts cuts this off. Plugins like Limit Login Attempts Reloaded or Login LockDown let you define how many failed attempts trigger a lockout, and for how long. Setting three to five attempts before a 30-minute lockout stops the vast majority of automated attacks.
Limiting login attempts is a key part of any wordpress security checklist to prevent brute-force attacks.
Step 6: WordPress Security Checklist – Install a Security Plugin
A dedicated security plugin handles many of the items on this checklist automatically and adds layers of protection you would otherwise have to configure manually. Think of it as a security guard who never sleeps.
Top options include:
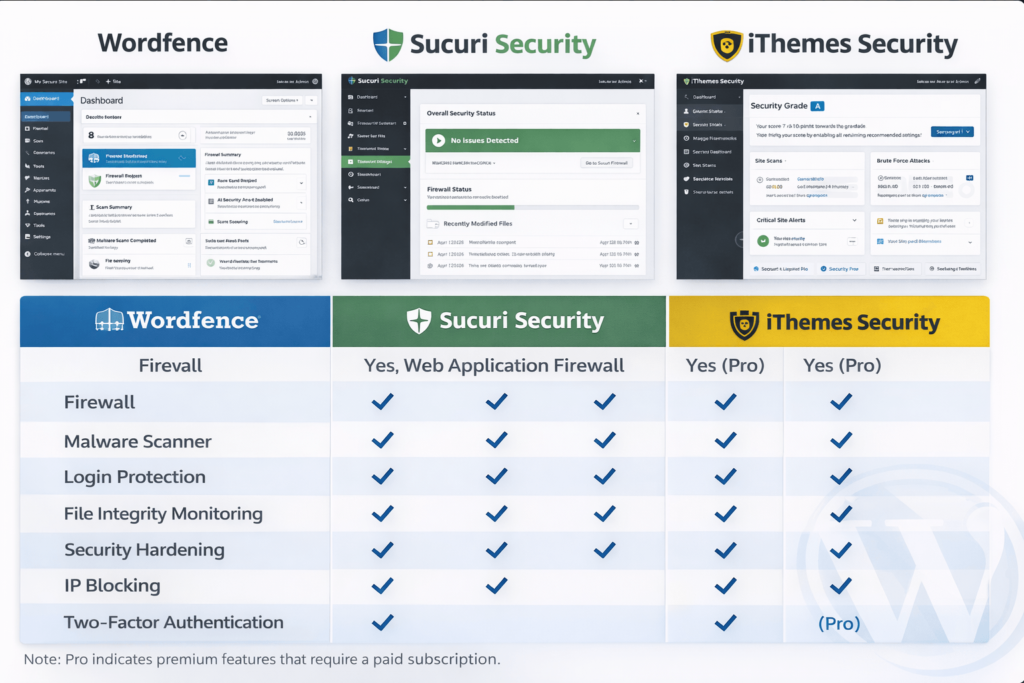
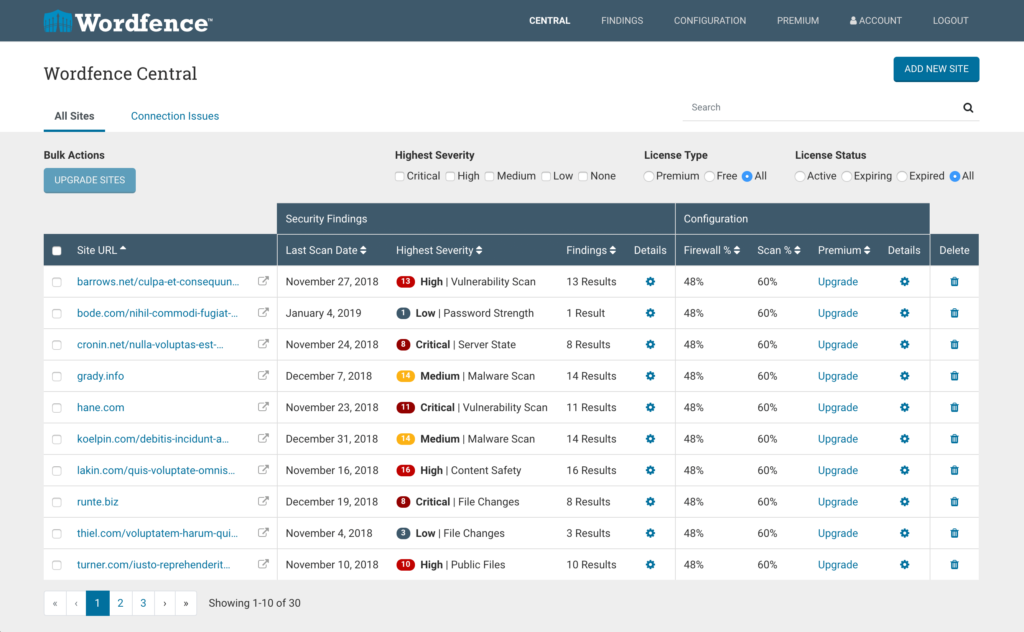
- Wordfence Security: Includes a firewall, malware scanner, and login protection. Excellent for most sites.
- Sucuri Security: Strong on monitoring, scanning, and a cloud-based WAF (paid). Great track record in incident response.
- iThemes Security (now Solid Security): Good all-rounder with file change detection and brute-force protection.
- All In One WP Security & Firewall: Solid free option with a visual security strength indicator.
| Note: Do not install more than one security plugin at a time. They often conflict with each other and can create performance issues or even lock you out of your own site. |
Step 7: Move to HTTPS and Force SSL
HTTPS encrypts the data sent between your visitor’s browser and your server. Without it, passwords, form submissions, and session data travel in plaintext, readable by anyone who intercepts it.
Most hosts now offer free SSL certificates via Let’s Encrypt. Once your certificate is installed, force HTTPS across the entire site by adding the following to your wp-config.php:
define('FORCE_SSL_ADMIN', true);
Also, add a redirect rule in your .htaccess file:
RewriteEngine On
RewriteCond %{HTTPS} off
RewriteRule ^(.*)$ https://%{HTTP_HOST}%{REQUEST_URI} [L,R=301]
Step 8: Choose a Secure, Reputable Hosting Provider
Your host is the foundation everything else sits on. A poorly secured server undermines every other step you take. When evaluating hosts, look for:
- Server-level firewalls and malware scanning
- Automatic daily backups with one-click restore
- PHP version control (you should be on PHP 8.1 or higher)
- Free SSL certificates
- Isolated hosting environments (what happens on another account doesn’t affect yours)
Managed WordPress hosts like Kinsta, WP Engine, and Pressable build many wordpress security best practices directly into their infrastructure. If security is a priority, managed hosting is worth the extra cost.
Step 9: Harden wp-config.php and .htaccess
WordPress hardening starts with protecting your most critical files. The wp-config.php file contains your database credentials and secret keys that attackers would love to get their hands on.
1. wp-config.php protection
- Move it one directory above your web root if your host allows it
- Set file permissions to 400 or 440 (read-only)
- Add this to .htaccess to block direct access:
<files wp-config.php>
order allow,deny
deny from all
</files>
2 .htaccess protection
Similarly, protect your .htaccess file from direct access by adding to the bottom of the file itself:
<files .htaccess>
order allow,deny
deny from all
</files>
Step 10: Disable File Editing in the WordPress Dashboard
WordPress has a built-in editor that lets you modify theme and plugin code directly from the dashboard. If an attacker gains access to your admin panel, that editor is a direct route to injecting malicious code.
This is a small but important step in any wordpress security checklist.
Disable it by adding one line to wp-config.php:
Code
define('DISALLOW_FILE_EDIT', true);
Step 11: Set Correct File and Directory Permissions
Incorrect file permissions are a common wordpress vulnerability that lets attackers read, write, or execute files they shouldn’t be able to touch. The recommended permissions for a WordPress installation are:
- Directories: 755 (readable by server, writable only by owner)
- Files: 644 (readable by all, writable only by owner)
- wp-config.php: 400 or 440 (read-only, no public access)
Code
find /path/to/wordpress/ -type d -exec chmod 755 {} \;
find /path/to/wordpress/ -type f -exec chmod 644 {} \;
Check and fix permissions via FTP (FileZilla), your hosting file manager, or with this SSH command:
Step 12: Hide or Rename the WordPress Login URL
By default, any WordPress site can be accessed at yoursite.com/wp-login.php or yoursite.com/wp-admin. Bots know this. They hammer those URLs constantly.
Plugins like WPS Hide Login let you change the login URL to something unpredictable, like yoursite.com/team-portal or yoursite.com/launch. This does not replace other security measures, but it drastically reduces automated bot traffic hitting your login page.
Hiding the login URL is a simple but effective step in a wordpress security checklist.
| Important: Write your new login URL somewhere safe before activating. If you forget it and lock yourself out, recovery through FTP or phpMyAdmin is required. |
Step 13: Disable XML-RPC If You Do Not Use It
XML-RPC is a protocol that allows remote communication with your WordPress site, used by the Jetpack plugin, the WordPress mobile app, and some third-party tools. However, it is also frequently exploited for brute-force attacks and DDoS amplification.
If you don’t use Jetpack or the mobile app, disable it completely by adding this to your .htaccess:
Code
<files xmlrpc.php>
order deny,allow
deny from all
</files>
Step 14: Run Regular, Tested Backups
Backups are not a security measure in themselves, but they are your escape hatch when everything else fails. The goal is to recover from an attack quickly with minimal data loss.
A solid backup strategy covers:
- Full site backups (files + database) at least daily for active sites
- Backups stored in a separate location from your server (cloud storage: Google Drive, Amazon S3, Dropbox)
- Retention of at least 30 days of backups
- Regular tests are used to confirm that backups actually work
Recommended backup plugins: UpdraftPlus (free and excellent), BackupBuddy, or Jetpack Backup (real-time backups for high-traffic sites).
Step 15: Scan Your Site for Malware Regularly
Malware on a WordPress site can sit quietly for weeks or months before causing visible damage. A regular scan catches infections early, before search engines blacklist your site or your host suspends your account.
Use Wordfence or MalCare for on-site scanning. For an external perspective, run your URL through Sucuri SiteCheck (free) or Google Safe Browsing to see what external monitors see.
Step 16: Review and Tighten User Roles and Access
Every person with access to your WordPress site is a potential attack vector not because they are malicious, but because their account could be compromised.
Audit your users list at Users > All Users. Apply the principle of least privilege: give each user only the access level they actually need. A blog contributor doesn’t need Administrator access. A one-time developer who finished their project three months ago shouldn’t have access at all.
- Administrator: Full access. Should have the fewest accounts.
- Editor: Can manage all posts and pages, but not settings or plugins.
- Author: Can publish and manage their own posts only.
- Contributor: Can write posts but cannot publish without editorial approval.
- Subscriber: Read-only access. Most members/customers should be here.
Step 17: WordPress Security Checklist – Use a Web Application Firewall (WAF)
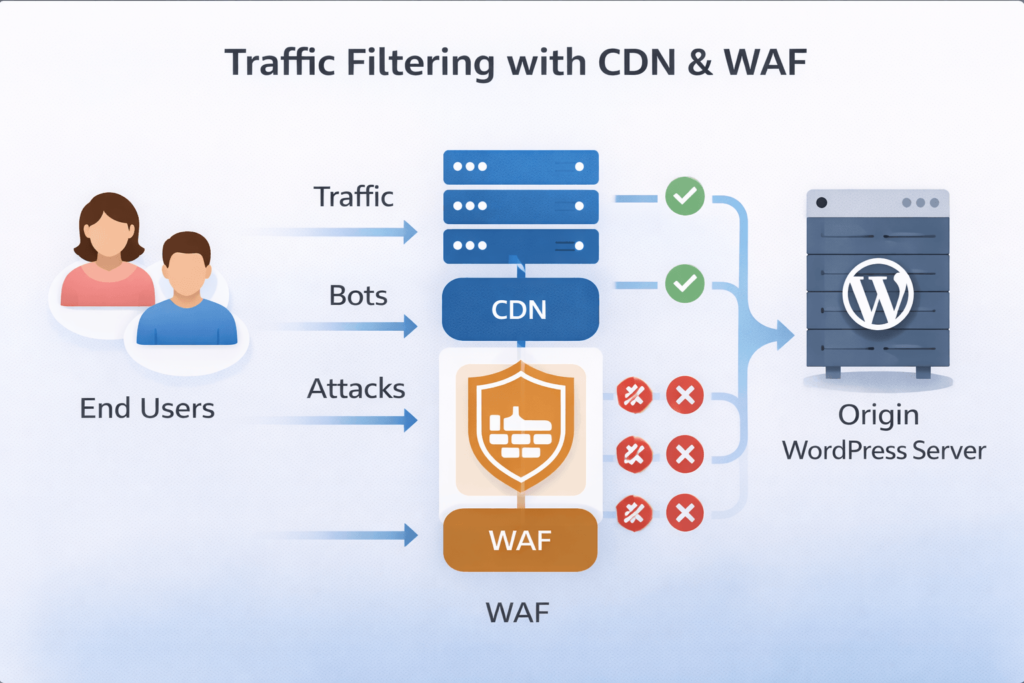
A Web Application Firewall sits between your website and incoming traffic, inspecting requests and blocking malicious ones before they ever reach WordPress. It is one of the most effective layers of protect wordpress from hackers strategy you can implement.
Options include:
- Cloudflare (free tier available): DNS-level firewall with DDoS protection and bot filtering
- Sucuri WAF (paid): Specifically built for WordPress; excellent for sites that have been attacked before
- Wordfence: Includes an application-level WAF as part of the plugin
| Need a hand? We’ve got you covered. If securing your site feels like a full-time job (because it kind of is), you can take it off your plate. From hardening audits to ongoing maintenance, we handle it all so you can focus on running your business. Get in touch with our team now |
Step 18: Remove Unused Themes and Plugins
A deactivated plugin is not a safe plugin. If it is sitting on your server and contains a vulnerability, attackers can still exploit it. The same applies to themes.
Go to Plugins > Installed Plugins and delete anything you are not actively using. Do the same for themes at Appearance > Themes. Keeping WordPress lean is good for security and for performance.
Cleaning unused plugins is a critical part of a secure wordpress website checklist.
Step 19: Protect Your WordPress Admin Directory
You can add an extra layer of authentication to the /wp-admin directory by password-protecting it at the server level via .htaccess. This means even if someone bypasses the WordPress login somehow, they hit another password prompt first.
Most cPanel hosts make this straightforward under the “Directory Privacy” or “Password Protect Directories” section. Alternatively, “restrict /wp-admin” access to your IP address is only particularly effective if you work from a static IP.
Step 20: Disable Directory Browsing
Without this protection enabled, anyone can type yoursite.com/wp-content/plugins/ into a browser and see a full list of your installed plugins, a helpful gift to any attacker.
Disable directory browsing by adding this line to your .htaccess file:
Code
Options -Indexes
Step 21: Keep Your Database Secure
A few database-level hardening steps significantly reduce the damage a successful SQL injection attack can do:
- Change the default table prefix: WordPress uses ‘wp_’ by default. Change it to something random (e.g., ‘x7k2_’) during installation, or use a plugin like Brozzme DB Prefix on existing sites.
- Limit database user permissions: Your WordPress database user only needs SELECT, INSERT, UPDATE, and DELETE privileges. Revoke DROP, ALTER, and GRANT.
- Regular database backups: Covered in Step 14, but worth emphasising separately.
Database protection is often overlooked in a wordpress security checklist, but it is critical for security.
Step 22: Set Up Security Activity Logging
An activity log tells you exactly what happened on your site and when. If something goes wrong, it is invaluable for incident response. Without it, you are flying blind.
Install WP Activity Log (formerly WP Security Audit Log) to track login attempts, plugin changes, file edits, user role changes, and more. Set it to alert you by email for high-severity events.
Step 23: Monitor for Downtime and Unusual Traffic
Sometimes the first sign of an attack is unexpected downtime or a spike in server load. Uptime monitors catch this in real time so you can react quickly.
Free tools like UptimeRobot alert you by email or SMS the moment your site goes down. For more detailed traffic anomaly detection, review your hosting control panel’s resource usage charts or set up Google Search Console alerts for manual actions or security issues.
Step 24: Use a Content Delivery Network (CDN)
A CDN distributes your site’s content across servers around the world. Beyond performance benefits, it acts as a security buffer: traffic passes through the CDN before hitting your origin server, which means DDoS attacks and malicious bots often never reach WordPress at all.
Cloudflare’s free plan is a solid starting point. It includes DDoS protection, basic bot filtering, and the option to enable “Under Attack Mode” during an active incident.
Step 25: Know When to Call in a Professional
There is a point at which DIY security becomes genuinely risky, not because you lack the willingness, but because some situations require specialist knowledge. Knowing when to hand over is itself a security decision.
Consider getting professional help when:
- Your site has already been compromised, and you are unsure of the full extent
- You are running an e-commerce site or handling sensitive customer data
- You have tried to implement hardening steps, and something broke
- You do not have time to manage updates, backups, and monitoring consistently
Bonus: Three Extra Steps for Developers
If you’re comfortable in code and want to go further, these additional measures are worth implementing:
Bonus 1: Add Security Headers
HTTP security headers tell browsers how to behave when handling your site’s content. Add these via .htaccess or your server configuration:
- Content-Security-Policy: Restricts what resources the browser can load
- X-Frame-Options: SAMEORIGIN prevents clickjacking
- X-Content-Type-Options: nosniff prevents MIME-type sniffing attacks
- Strict-Transport-Security enforces HTTPS connections
Bonus 2: Implement CAPTCHA on Login and Comment Forms
Adding Google reCAPTCHA or Cloudflare Turnstile to your login page, registration form, and comments stops bot submissions without adding much friction for real users. Plugins like Simple Cloudflare Turnstile make setup painless.
Bonus 3: Run a Regular Security Audit
At least twice a year, run a formal security audit: review all user accounts, check file permissions, scan for vulnerabilities, verify your backups restore correctly, and test your login lockout settings. Treat it like a quarterly business review, boring but critical.
Frequently Asked Questions
1. How often should I update WordPress for security?
Update WordPress core as soon as minor updates are available they are typically released to patch security vulnerabilities and are safe to install immediately.
For major version updates (e.g., WordPress 6.x to 7.x), test on a staging site first, then apply to production within a week or two of release.
Plugins and themes should be updated at least weekly. If you use a managed host, many of these updates can be automated with appropriate safety checks.
2. What are the most common WordPress vulnerabilities?
The most common wordpress vulnerabilities fall into a few categories: outdated plugins or themes with known exploits, weak or reused admin passwords, SQL injection through poorly coded plugins, cross-site scripting (XSS) attacks, and brute-force attacks on the login page.
The WPScan vulnerability database tracks thousands of known WordPress vulnerabilities and is a useful resource for understanding what is currently being exploited in the wild.
Keeping software updated and following this checklist addresses the vast majority of these risks.
3. Is WordPress secure out of the box?
WordPress core itself is developed with security in mind and has a dedicated security team. The core software is reasonably secure when it is kept updated.
The risk comes primarily from the ecosystem around it: the thousands of third-party plugins and themes, user behaviour (weak passwords, excessive admin accounts), and hosting environment choices.
A default WordPress installation with no hardening applied is not secure enough for a production website. That is exactly what this wordpress security checklist is designed to fix.
4. How do I know if my WordPress site has been hacked?
Signs include: unexpected admin accounts appearing, your homepage redirecting to another site, Google showing a ‘This site may be hacked’ warning, unusual spikes in traffic or server load, your host suspending your account, or visitors reporting malware warnings in their browsers.
Run a scan with Wordfence or Sucuri SiteCheck to get an immediate read on whether your site is compromised. Check Google Search Console for manual actions under the Security Issues section.
If you find signs of compromise, do not panic take your site offline if necessary, contact your host, restore from a clean backup, then apply the steps in this checklist before bringing the site back up.
5. Do I need a dedicated security plugin or is my hosting enough?
Most hosting providers offer server-level security (firewalls, malware scanning, DDoS protection) but this does not cover application-level vulnerabilities within WordPress itself.
A dedicated WordPress security plugin like Wordfence or Sucuri adds application-level protection: monitoring WordPress-specific login attempts, scanning plugin and theme code for malicious patterns, and enforcing wordpress security best practices at the CMS level.
The best approach is both: a secure host and a WordPress security plugin. They protect different layers of your stack.
6. How much does WordPress security cost?
Many of the most effective steps on this checklist are completely free: updating software, using strong passwords, enabling 2FA, disabling XML-RPC, setting file permissions, and configuring .htaccess rules cost nothing but your time.
A paid security plugin like Wordfence Premium (~$99/year) or Sucuri WAF (~$199/year) adds meaningful protection for small businesses. Managed WordPress hosting with built-in security features typically runs $25-$100/month depending on the provider.
Weigh that against the average cost of cleaning up a hacked WordPress site, which ranges from $150 to several thousand dollars depending on the damage.
7. Can WordPress be hacked through a theme?
Yes, themes are a significant attack vector. Themes run code on your server, which means a vulnerability in a theme can be exploited just like a plugin vulnerability.
Risks include: using outdated themes with known vulnerabilities, downloading themes from unofficial or ‘nulled’ (pirated) sources which often contain pre-installed malware, and keeping inactive themes installed when they no longer receive security updates.
Only install themes from the official WordPress.org repository or reputable premium marketplaces like ThemeForest. Delete any themes you are not actively using, including the default Twenty-Something themes that come with WordPress.
8. What should I do if my WordPress site gets hacked?
First, put the site into maintenance mode or take it offline if possible to prevent visitors from encountering malware. Contact your hosting provider many have a security response process and can help identify compromised files.
Restore from a clean, pre-infection backup if you have one. If not, use a professional malware removal service from Sucuri or Wordfence to clean the site manually.
After cleaning, change all passwords (WordPress, hosting, FTP, database), audit all user accounts, and go through this entire wordpress security checklist before taking the site back online. Skipping the hardening step is how sites get reinfected within days of cleanup.
Conclusion
WordPress security is not a one-time project. It is a set of ongoing habits and configurations that, once in place, run largely in the background. Here is the quick recap of what matters most:
- Keep everything updated: Core, themes, and plugins weekly at a minimum.
- Use strong credentials and 2FA: The login page is where most attacks begin.
- Harden your configuration files: wp-config.php and .htaccess are your first line of server-side defence.
- Install a security plugin and WAF: Automated protection that works around the clock.
- Back up regularly and test your restores: Your escape hatch when everything else fails.
- Remove what you don’t need: Unused plugins, themes, and users are unnecessary risk.
- Monitor and audit: Know what is happening on your site before attackers tell you.
- Know when to get professional help: Some situations genuinely require an expert.
Running a secure WordPress site is entirely achievable, even without a deep technical background. Work through this checklist step by step, and you will have covered more ground than the vast majority of WordPress site owners ever do. That alone puts you well ahead.
The threats are not going away, but neither are the tools available to stop them. Stay updated, stay backed up, and stay consistent.
Need a hand? We’ve got you covered.
If securing your site feels like a full-time job (because it kind of is), CodeCaste can take it off your plate. From hardening audits to ongoing maintenance, we handle it all so you can focus on running your business. Feel free to get in touch if you need further assistance, and our team would be glad to support you